Home > How To Buy Computer Case Lights
A Guide To LED Lights, El Wire, and Other Computer Lighting
Computer Lighting
Author: Paul J. Reitschky
www.marnscda.com
We encourage readers who find this information beneficial to share it with friends or other interested parties. Readers are encouraged to link to this article from their own websites.
Case lighting is always an important part when planning the perfect case mod. Deciding, what color, what type, and how much, can be tricky. There are several things to consider when coming up with the proper plan. What I will attempt to explain in this article is the types of lighting available along with when and how to use each type. Hopefully this information will help when making choices on your lighting schema. There are three main type of case lighting used, cold cathode, LED (Laser, Fan, etc...), and EL wire lighting. All three have very distinct looks, and style, and all three can be used individually or in a multitude of combinations.
Cold Cathode:
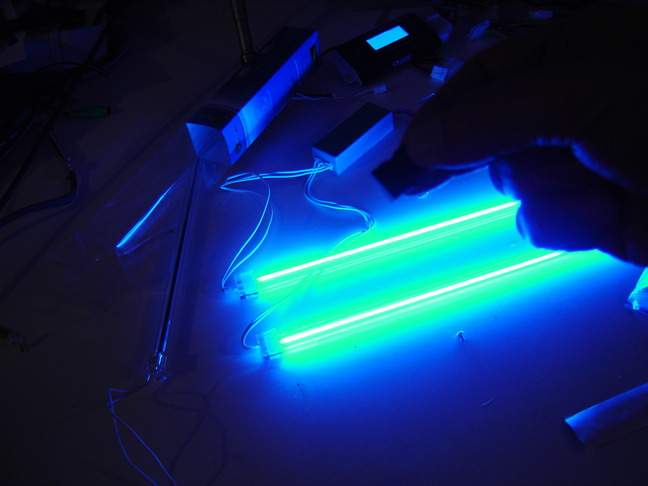
Lets start with the most widely used lighting, cold cathode. Without getting too technical, this type of lighting is similar to a fluorescent bulb in concept, but shrunk into a very small tube. The cold cathode light contains a lighting element. This is the strip that looks like a string in the center of the tube, that emits a specific color depending on the materials used in the element. Also provided is a starter, or power regulator that converts the 12v DC current to the proper voltage and amperage for the cold cathode light. Each starter can generally hook up to two separate cathode tubes. The most common sizes of cathodes used for case modifications are 4" and 12", and come in several different colors, including your basics (Red, Blue, Green, and Purple), and the very popular UV reactive. The benefits of the cold cathode light is pretty simple. The lights use low power with high luminescence and remain relatively cool. Cold cathode is generally the brightest lighting a case can get without dramatically impacting temperature. This is very important because you don't want to have so much lighting that you need extra cooling just to keep up with the extra heat created.
Installation is pretty simple. Most kits come with a starter or converter, and the light tubes. The standard starters generally have two connectors so you can connect two tubes per power source.
To hook up the power you will find a 4-pin 12volt converter, that plugs into the starter. Most cathode kits come with a switch for turning the lights on and off, and these are generally hooked to the 4-pin 12v connector and the 2-pin starter connector. The starter has three inputs, two 3-pin connectors that connect directly to the cathode tube, and a 2-pin connector that connects to the power source.
 |
 |
When deciding where to mount the lights, keep in mind where your power is coming from, so that hiding the wires from plain site is easy. Mounting the lights in the case can be done using the Velcro provided. A good tip when adhering the lights, is to put the Velcro together and adhere the open side on the lights first, then place the light into location. This makes it much easier to get the Velcro strips in the correct location. Another recommendation is to mount the Velcro in the case along the inner edges (not on the case window, or any other piece that requires removing). I have seen people mount the tube directly on the window panel and would not recommend this because this will make opening the case more difficult. If mounted on the inner part of the chassis, you can hide the wires and leave the light hooked up while opening the side panels. Don't be afraid to experiment, and move the lights until you find the correct placement to properly accent the interior of the case.
LED:
Another type of lighting used in cases are LED. These come in many forms and can be found attached to many other case devices to add accent and style. LED's are a very energy efficient form of lighting, however the light emitted is not always bright enough on its own to illuminate an entire case. This is why they are generally used in combination with other devices, such as case fans. The two most widely used forms of LED lighting are the 3-direction laser LED and the LED case fan. Both types do a great job of adding a little extra flare in what normally is a bare or bland area.
LED Case Fans:
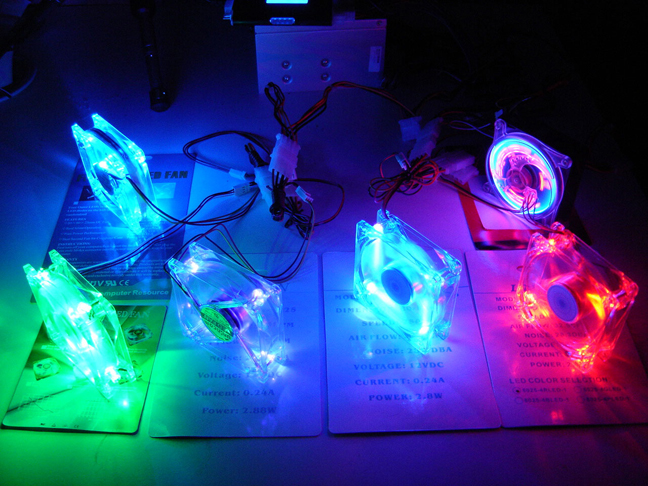
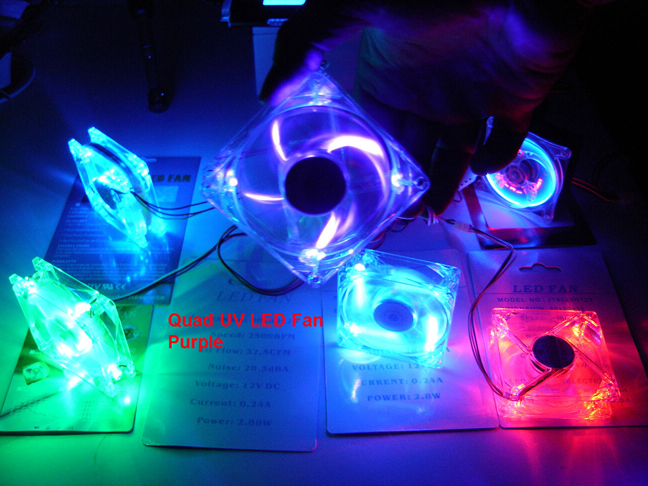
The LED case fans come in many different forms and styles. The idea of a case fan is the best of both worlds. The fan helps remove unwanted hot air, and at the same time adds nice color to any case with viewable insides. I will be showing you a few different types, ranging from quad LED fans to UV reactive models. There are a few types, and the main difference is how the LED's are mounted. Some are mounted in the plastic fan frame itself, while others use a tape method to adhere micro LED's to the outside. Both styles are functional, and it's a matter of preference and style when deciding on which options are right for you.
Mounting these devices is the same process as any normal fan. They come in a few sizes and the most common is 80mm. The quad LED fans provide 4 LED's mounted into the fan's casing and for power hookup there are two type 12v 4 pin converter that connect directly to the power supply, and 3-pin 5 volt motherboard connector. Almost every case has at least one extra case fan mounting location, so for a few dollars the case fan can add a nice accent with just a few minutes for installation.
Lazer LED:
The second most common form of LED lighting is the lazer LED. These little units are a more direct form of lighting, and can be mounted almost anywhere in a chassis. What I mean by direct lighting is, these modules are point oriented or more like a spotlight then the diffused lighting you get from a cold cathode unit. The laser LED generally comes with Velcro and mounting screws for easy placement and removal. Power hook up is the same as the cold cathode, and just plugs in the 4-pin 12v Molex connector. These come in several different colors, including UV reactive, the same as the cold cathodes and case fans. As you can see in the photos, the lighting on Lazer LED's is generally three lights spread in a synchronic pattern.
EL wire:
The third, and newest form of case lighting is EL wire. This lighting reminds me of Christmas tree lighting, simply because it is a wire that lights up. The advantages of lighting wire is that all you need to do is wrap whatever you want to accent with the wire and your done. The EL wire is very flexible and extremely versatile, with the disadvantage being uneven installation can sometimes look a bit strange, so keep this in mind when planning out your lighting design.
There are several ways to affix the wire to the case. You can use electrical tape, wire ties / zippies, or my favorite, hot glue. Keep in mind when using hot glue that it is harder to change the placement after the glue has set. Also, always use clear glue to minimize visible defects, and be careful not to melt the wire with the glue gun. It can and does happen.
Lighting Combinations:
As I mentioned before, the best way to properly light a case is to use more than one form of lighting. For example: use some cold cathode lights along the inner window of the case, and add a few similarly colored LED fans to accent the other section. Or, use a Laser LED to highlight a particular spot in the case, and some LED fans to offset the laser.
There are a lot of specialty items that can help customize a case and give it that little extra something. You can get everything from sound activated devices, that strobe the lighting with the audio from your favorite game or movie. In the past I have tried incorporating things like Front Panel Fan Buses that add a little something extra, plus provide fan control. Be creative and try using objects that help accent your design (for example, UV reactive components are easy to find, like wire sleeves, or images that have UV properties).
Things to keep in mind when purchasing and installing computer lighting:
- Never play with the Power Connectors when the computer power supply is plugged in. (You don't want to fry any PC equipment by accidentally crossing wires, not to mention your own safety)
- Power use / Available connector. Buy the correct types of lighting.
- Space is always a concern that why there are some many types to chose from.
- Color keep to s scheme most lighting all come in similar colors when using more then one type.
- UV reactive components. You can add extra flare using UV reactive parts and UV paints that will POP with the UV lighting.
- Don't be afraid to experiment. Most of the lighting is relatively inexpensive and all types produce low heat. Mix and match to make the best look.
- Make sure the wiring is safe and clean. There is nothing worse then a brightly lit case with a rats nest of wires inside. That's a recipe for internal house fire any day of the week.
Conclusion:
No matter what types of lighting you decide on, make sure it's safe and looks the way you want it to. With all the choices available, the hardest part will always be deciding what will look is right for you. Never be afraid to experiment with ideas. Try utilizing the internet for case discussions on message boards. There are always great ideas floating around in cyberspace. Be sure to look around and you will find several lighting accessories that might fit your case. There are handles, SM card readers, LED case legs, and more. Lastly, keep in mind that if you don't like the way it looks, you can always change it.